Open Image you wish you manipulate

Now remove the sky so that we can add another amaizing sky into the picture
There are different ways to remove the sky but i will use channels
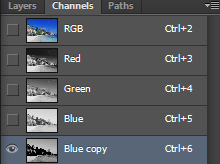
Go to Window > Channels . On this palette you can see four different layers – RGB, Red, Green and Blue.

Right click on the Blue channel and select the option Duplicate Channel… Make visible only this duplicated Channel

Go to Image > Adjustments > Levels or press Ctrl + L on your keyboard. Set the Input Levels on 128; 1,00; 232 and press OK. You should get something like on the following picture.


White color shows part of the picture which will be selected and black part stays unselected. If you let some grey colors in the picture they will be selected .To make the whole ground black grab the Brush Tool (B), pick black color and simply paint over the grey areas of the water.
Carefully paint over them with white brush. You should get something like on the picture below. On the following picture you can see how the channel should looks like.

Make visible all channels except the one named “Blue Copy”. Go to Select > Load Selection and set the window which appear as on the picture below. Press OK.


Do that by pressing Ctrl + Shift + I on your keyboard or go to Select > Invert. Then click on the button Add layer mask which can be found in the bottom part of Layers palette.


Below is my picture after removing the sky

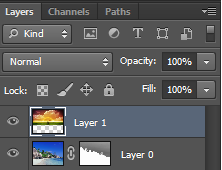
Open new sky photo, drag it ontop of your Image and it will create a new Layer

To make new sky the background simply drag Sky layer on top of backgroung layer (layer0)
Press CTRL+T to resize and position the sky so that it can fit well, then press enter when you are satsified

Now play with Light and adjust colours on both two layers as i desire
With layer 1 selected, am now going to add more light into sky layer
image- adjustment- exposure and play with it until am satsified
will do the same to background layer

Create a new layer on the top of all layers and name it LENS FLARE. Grab the Gradient Tool (G) and fill this new layer with solid black color.
Go to Filter > Render > Lens Flare and set lens type to 50-300mm zoom
Add rainbow to the image - ( Follow previous tutorial http://photoshopeditingtutorials.blogspot.com/2012/10/how-to-add-rainbow-in-photo.html on how to add rainbow into an image)
I will also add a fantansy girl and a bird to the image
Finaly will Go to Image- Adjustment - Levels and play with it until you are satsified
Below is my Image after manipulation
