How to Apply Iris Blur

Iris Blur tool allows you to add blur to an image that fakes a shallow depth of field

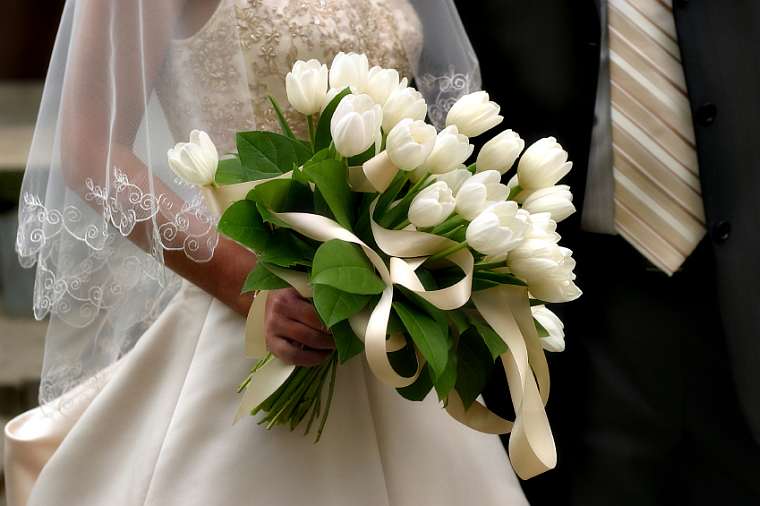
Open your image in Photoshop
In this tutorial am going to add blur to the whole picture except the flower


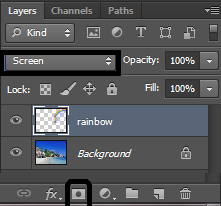
Duplicate background Layer

Ctrl+J or go to  Layer -New- Layer via Copy


Now, you will be having two layers, background layer and Layer 1 which is the copy of background layer

Go to Filter > Blur > Iris Blur


Click on your image and a cycle will appear, everything outside the cycle will be blurred
Play with dots to reposition where you dont want to be blurred
When you are satsified now your right hand side in Blur tool slider you can set amount of blur you want


When you are satisfied simply click Ok and press enter


Below is final image


How to Add Rainbow in a photo

Now lets learn how to add realistic Rainbow to a photo

Open an Image in Photoshop


Add a new Layer
Go to Layer - New - Layer or simply click Shift+Ctrl+N
Name new Layer Rainbow

Select  Gradient Tool , make sure Rainbow layer is selected


Click on the Gradient Picker in the Options Bar, a list of additional Gradient will appear then choose special effect


A window will pop up asking if you want to apply special effects then click Append


Now Go back to Gradient Editor and select Russell's Rainbow


Make sure Radial Gradient is selected


As per below image, now Drag out a rainbow gradient from right to left in the image then release your mouse


Now press Ctrl+T to be able to reposition the rainbow as you desire


Change blend mode Of The Rainbow Layer To Screen


Go to Filter > Blur > Gaussian Blur, to apply Gaussian Blur into the rainbow


Add blur into the rainbow until it looks soft and natural


With Rainbow Layer selected ,add a Layer mask 


You will see a white box appearing beside Rainbow layer


With Gradient tool selected, Go to gradient options and select Black,white


Choose "Linear Gradient" From The Options Bar


Drag A Black,white Gradient On The Layer Mask so that we can make rainbow appear brighter as it reaches into the sky


well, below is final result

How to Adjust Colors

Color Adjustment help to lighten and adjust colors in photos, this happens when you take a picture without flash or picture taken in dark place

As usual, start by opening your image in Photoshop


Go to Image > Adjustments > Levels,

Level window will pop up
Channel Drop Menu, this allows you to choose whether your changes should effect all the colors, or just one (red, green, or blue).
Input Levels: Black is for shadow, gray  for midtones and white is for highlights.
Make sure the Preview box is checked on, so that you can preview the picture as you make changes.


Choose the channel you wish to change and drag the triangles. Dragging black triangle to the right will make the shadows in your photo darker. Dragging the white triangle to the left will make the highlights in your photo lighter, and dragging it to the right will make the midtones darker. You will be able to see the changes in your image

Here is my Photo after editing


RED EYE REMOVAL

In this tutorial, we will learn how to remove red eye

Open Image you wish to edit


Click  Zoom  tool in the toolbox or press Ctrl++ to zoom in the image, so that you can have a clear view of the eye

Note : Make sure  default background and forebackground colors are black and white


Select the Red Eye tool from the toolbar


With the Red Eye tool active, click in the red part of the eye and the red will disappear,

If the correction doesn't match the size of the pupils or seems too light or too dark, undo the effect and change the Pupil Size or the Darken Amount setting on the Options bar and then reapply.


Below is my image after Editing


How To Reduce Noise in Photoshop

In this tutorial am going to demonstrate using my picture...  :)

1: open your image in photoshop


2: Go to Filter - Noise - Reduce Noise


3: Reduce Noise Window will pop up, play with it until you are satisfied with the result then click OK


Here is my Picture after editing

Tools

Now, lets have a detailed description of photoshop Tools

Marquee Tools - This selecting Tool can be used to select parts of the image or shapes


Move Tool - The move tool can be used to move/duplicate a selection or a layer by dragging it with a mouse or using  keyboard arrows keys


Lasso Tool - used to draw both freehand and straight edge selections and extract them according to your requirement.


 Magic Wand Tool - its useful for making quick, near-perfect selections. It is used to select objects or any similarly colored portions of an image


Slice Tool - designed to divide an image into smaller sections that fit together like a jigsaw (but with straight edges), it also cuts images to pieces for Web publications


Crop Tool - allows you to select an area of an image and discard everything outside this area.


Healing Brush Tool - This tool is used to fix image imperfections such as scratches, blemishes and also used as retouching tool


Brush Tool - Used to create special effects


More Tools will be added

PHOTOSHOP TOOLS

In this tutorial will have a quick view of Photoshop Tool
Sometimes its difficult to locate these tools from photoshop


Hope this is useful

How to Erase and Change Background

Open Image in photoshop


From tools select Magic Eraser Tool or Background Eraser Tool and click on the background to make the image transparent


Here is the result after removing the background


Now Open New background Image


Select Move Tool then drag the Image into the new Background Image

The Move Tool in Photoshop. Image © 2007 Photoshop Essentials.com.


Press CTRL+T to reposition the image as desired
Then go to Image- Adjustments - Hue and Saturation, play with them until you are satsified then
click OK

Below is the final result


Related Posts Plugin for WordPress, Blogger...