Learn how to create this fantasy photo manipulation of Red Riding Hood.
This tutorial will show you how to work with the Pen tool, create an
illusion of depth, lighting, and more!
Tutorial
Discover the fun and entertaining side of Photoshop by Downloading free tutorials
Showing posts with label Photo Manipulation. Show all posts
Showing posts with label Photo Manipulation. Show all posts
Create a Emotional Midnight Photo Manipulation with Painting-Like Effects
Learn how to composite this nighttime artwork and retouch skin with a smooth
painting-like effect! This tutorial will show you how to composite this
image with various stock photos, soften skin, and apply special
lighting and color effects.
Tutorial
Tutorial
Photo Manipulation - Solo
This tutorial will show you a few techniques that you can use in
your fantasy photo manipulations. You will use the Dodge/Burn to create
nice effects by enhancing the highlights and shadows of your stock
images. You will also learn how to create realistic shadows using the
brush tool.
Full Tutorial
Full Tutorial
Photo Manipulation- - Create a Surreal "Parting of the Sea"
Water, by its very nature is difficult to convincingly incorporate into a
composition. In this tutorial, you will discover how to combine
advanced masking techniques, blending modes, adjustment layers and
clever use of filters to part the sea and create a surreal photo
manipulation
Full tutorial
Full tutorial
How to add Flamming manipulation effects on your picture using Adobe Photoshop
Paint with fire
This tutorial will also give you good practice with Photoshop’s Levels and
Adjustment Layers – which can be extremely powerful if used properly –
as well as Layer Masks and Blend Modes to create stunning, and yet
sometimes quite subtle, effects
How to Give an image a Photo Manipulation - Fire Effect with Adobe Photoshop
How to Create a Flamming Photo manipulation - Flamming Skul
Making a Beautiful Transparent Wing for a Fairy
Learn how to make this eerie photo manipulation with fairy and
dragonflies flying around her. It will show you, how to make amazing
depth of field on your manipulation by simple steps. You will see, how
to use different blurs and blending modes on your work.
Full Tutorial
Full Tutorial
Collection of Photo Manipulation Tutorials with Adobe Photoshop
Create a Dark and Mysterious Fantasy Portrait
Create a Beautiful Abstract Portrait in Photoshop
Turn a Portrait Photo Into a Painting
Create Abstract Photo Manipulation with Tree Bark Texture and Brush Elements
Create a Surreal Photo Manipulation by Mixing Ice and Fire Textures
Create Leafy Face Photo Manipulation in Photoshop
Fantasy Photo Manipulation
This tutorial will show you how to combine different photos to create Fantasy Landscape Manipulation.
Open Image you wish you manipulate
Now remove the sky so that we can add another amaizing sky into the picture
There are different ways to remove the sky but i will use channels
Go to Window > Channels . On this palette you can see four different layers – RGB, Red, Green and Blue.
Right click on the Blue channel and select the option Duplicate Channel… Make visible only this duplicated Channel
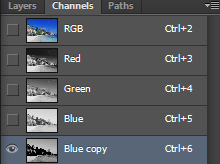
Go to Image > Adjustments > Levels or press Ctrl + L on your keyboard. Set the Input Levels on 128; 1,00; 232 and press OK. You should get something like on the following picture.
White color shows part of the picture which will be selected and black part stays unselected. If you let some grey colors in the picture they will be selected .To make the whole ground black grab the Brush Tool (B), pick black color and simply paint over the grey areas of the water.
Carefully paint over them with white brush. You should get something like on the picture below. On the following picture you can see how the channel should looks like.
Make visible all channels except the one named “Blue Copy”. Go to Select > Load Selection and set the window which appear as on the picture below. Press OK.
Do that by pressing Ctrl + Shift + I on your keyboard or go to Select > Invert. Then click on the button Add layer mask which can be found in the bottom part of Layers palette.
Below is my picture after removing the sky
Open new sky photo, drag it ontop of your Image and it will create a new Layer
To make new sky the background simply drag Sky layer on top of backgroung layer (layer0)
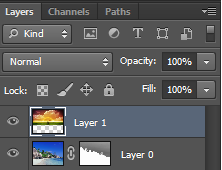
Press CTRL+T to resize and position the sky so that it can fit well, then press enter when you are satsified
Now play with Light and adjust colours on both two layers as i desire
With layer 1 selected, am now going to add more light into sky layer
image- adjustment- exposure and play with it until am satsified
will do the same to background layer
Create a new layer on the top of all layers and name it LENS FLARE. Grab the Gradient Tool (G) and fill this new layer with solid black color.
Go to Filter > Render > Lens Flare and set lens type to 50-300mm zoom
Add rainbow to the image - ( Follow previous tutorial http://photoshopeditingtutorials.blogspot.com/2012/10/how-to-add-rainbow-in-photo.html on how to add rainbow into an image)
I will also add a fantansy girl and a bird to the image
Finaly will Go to Image- Adjustment - Levels and play with it until you are satsified
Below is my Image after manipulation
Open Image you wish you manipulate
Now remove the sky so that we can add another amaizing sky into the picture
There are different ways to remove the sky but i will use channels
Go to Window > Channels . On this palette you can see four different layers – RGB, Red, Green and Blue.
Right click on the Blue channel and select the option Duplicate Channel… Make visible only this duplicated Channel

Go to Image > Adjustments > Levels or press Ctrl + L on your keyboard. Set the Input Levels on 128; 1,00; 232 and press OK. You should get something like on the following picture.
White color shows part of the picture which will be selected and black part stays unselected. If you let some grey colors in the picture they will be selected .To make the whole ground black grab the Brush Tool (B), pick black color and simply paint over the grey areas of the water.
Carefully paint over them with white brush. You should get something like on the picture below. On the following picture you can see how the channel should looks like.
Make visible all channels except the one named “Blue Copy”. Go to Select > Load Selection and set the window which appear as on the picture below. Press OK.
Do that by pressing Ctrl + Shift + I on your keyboard or go to Select > Invert. Then click on the button Add layer mask which can be found in the bottom part of Layers palette.
Below is my picture after removing the sky
Open new sky photo, drag it ontop of your Image and it will create a new Layer
To make new sky the background simply drag Sky layer on top of backgroung layer (layer0)

Press CTRL+T to resize and position the sky so that it can fit well, then press enter when you are satsified
Now play with Light and adjust colours on both two layers as i desire
With layer 1 selected, am now going to add more light into sky layer
image- adjustment- exposure and play with it until am satsified
will do the same to background layer
Create a new layer on the top of all layers and name it LENS FLARE. Grab the Gradient Tool (G) and fill this new layer with solid black color.
Go to Filter > Render > Lens Flare and set lens type to 50-300mm zoom
Add rainbow to the image - ( Follow previous tutorial http://photoshopeditingtutorials.blogspot.com/2012/10/how-to-add-rainbow-in-photo.html on how to add rainbow into an image)
I will also add a fantansy girl and a bird to the image
Finaly will Go to Image- Adjustment - Levels and play with it until you are satsified
Below is my Image after manipulation
How to Add a Flower on Girl's Hair
This is a very simple and quick tutoria on how to add a flower on girls hair
Open you images in photoshop, I will use below images
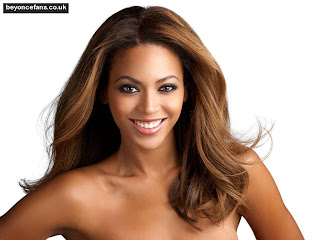
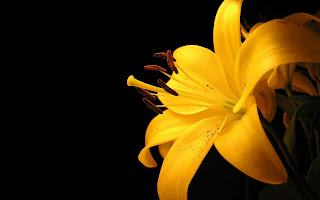
Remove flower background using Erase tool and Magic erase Tool
Then drag the flower on top of girls image, then click CTRL+T to resize and position the flower using handles
Apply burn tool to make the flower a bit darker
Then add noise to make it look real
Filter - Noise - Add Noise, then will set amount to 2, and makesure Gaussian and Monochromatic is selected
Go to Image - Adjustments - Exposure and Brightness and contrast to fix color as you desire
Below is my final result
Open you images in photoshop, I will use below images


Remove flower background using Erase tool and Magic erase Tool
Then drag the flower on top of girls image, then click CTRL+T to resize and position the flower using handles
Apply burn tool to make the flower a bit darker
Then add noise to make it look real
Filter - Noise - Add Noise, then will set amount to 2, and makesure Gaussian and Monochromatic is selected
Go to Image - Adjustments - Exposure and Brightness and contrast to fix color as you desire
Below is my final result
Subscribe to:
Posts (Atom)


