Open an Image in Photoshop

Add a new Layer
Go to Layer - New - Layer or simply click Shift+Ctrl+N
Name new Layer Rainbow
Select Gradient Tool , make sure Rainbow layer is selected


Now Go back to Gradient Editor and select Russell's Rainbow

Make sure Radial Gradient is selected
As per below image, now Drag out a rainbow gradient from right to left in the image then release your mouse

Now press Ctrl+T to be able to reposition the rainbow as you desire

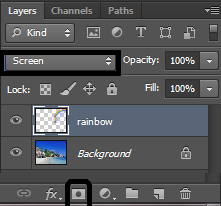
Change blend mode Of The Rainbow Layer To Screen

Go to Filter > Blur > Gaussian Blur, to apply Gaussian Blur into the rainbow

Add blur into the rainbow until it looks soft and natural

With Rainbow Layer selected ,add a Layer mask
You will see a white box appearing beside Rainbow layer

With Gradient tool selected, Go to gradient options and select Black,white

Choose "Linear Gradient" From The Options Bar

Drag A Black,white Gradient On The Layer Mask so that we can make rainbow appear brighter as it reaches into the sky

well, below is final result

